Shadowrocket Setup Guide
Import a Configuration and Verify the Connection
Start with an existing subscription or server details, then add it, choose a mode, connect, and verify the result. This page covers the essentials for getting started; see troubleshooting for complex rules and persistent issues.
Complete a full verification of one configuration before importing more or adjusting rules. The official screenshots below help identify interface elements. Fields may vary by Type, configuration, and app interface; follow what appears on your device.
Add Server: Import an Existing Subscription or Server
Choose one way to add it. Move on to mode selection after saving and confirming that an entry appears.
Existing subscription link: use Subscribe
Open Home in Shadowrocket and find Add Server near the SERVER group. On the add screen, tap Type, choose Subscribe, and enter the complete subscription link you already have in the appropriate address field. A subscription is not a regular website homepage or a single server domain; use the subscription address specifically provided to you by your service provider. When copying it, keep any parameters after the question mark and avoid adding spaces, line breaks, quotation marks, or explanatory text from a chat message.
Add a recognizable label and save, then wait for the subscription contents to load. Return to Home and check whether the subscription group and its server entries appear. If the group name appears without any servers, do not turn on the connection switch yet. First check whether the subscription loaded successfully, then confirm the address is complete and your subscription access is still valid. Updating a subscription fetches remote content again, so manual changes to server settings in a subscription may be overwritten. Check the configuration source before making long-term changes.
Existing server details: enter fields according to Type
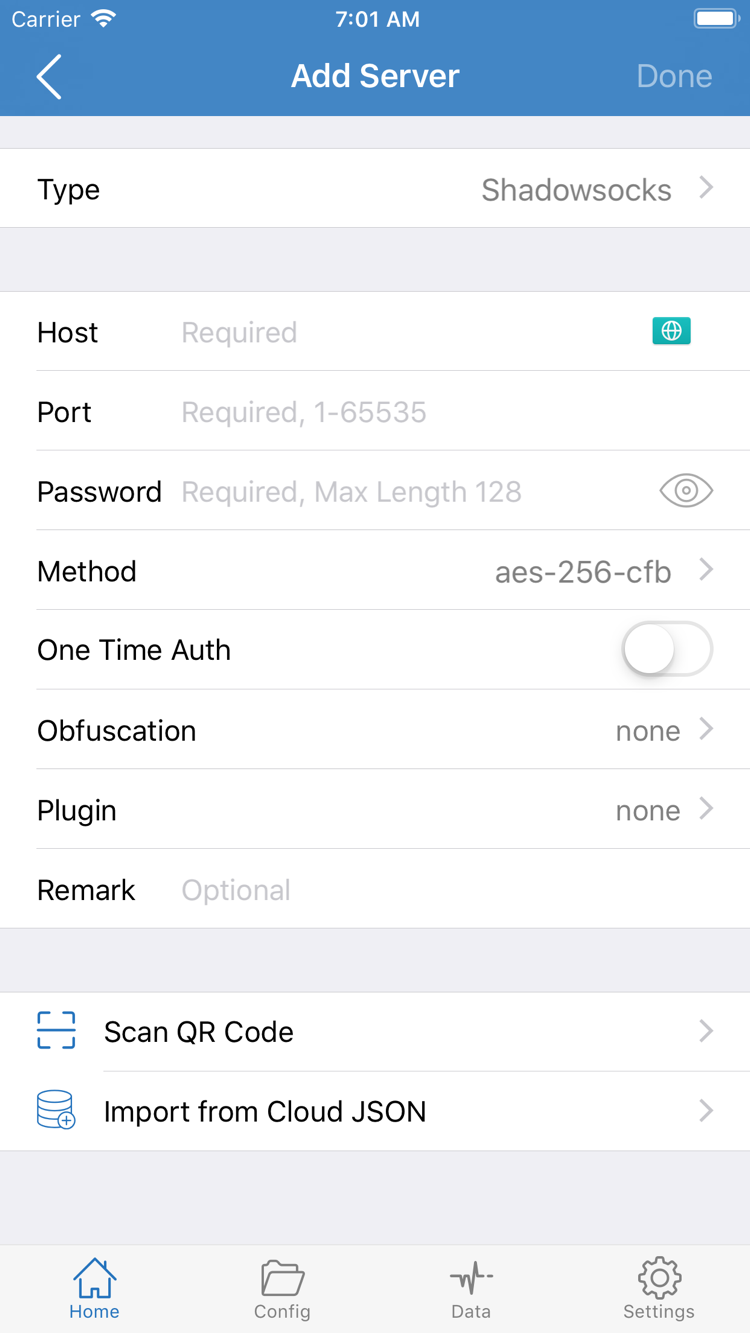
If you have individual parameters, select the corresponding Type in Add Server, then enter Host, Port, and the authentication details required for that type. The Password and Method fields in the official screenshot apply to the selected type; not every protocol uses the same fields. Enter details for Shadowsocks, VMess, VLESS, Trojan, and other types according to the information you have. Do not swap them just because some fields look similar.
Host is usually a domain name or IP address; do not add a web page path. Port must match the port provided for the server. If your details also include TLS, a transport method, a path, or other parameters, check each one. Before saving, check for easily missed characters at the beginning and end, especially in copied authentication details. If you are unsure what a field means, check with your service provider rather than trying guessed values.
Existing QR code: use Scan QR Code
If you have a compatible configuration QR code, use Scan QR Code to start scanning. Allow camera access if the system requests it and you need it. After scanning, check the detected Type, Host, and Port before saving. Import from Cloud JSON is a separate import option; do not confuse a regular subscription link or web address with a JSON configuration. QR codes and subscription links may contain access credentials, so do not share them in public forums.
Return to Home and select the newly added server in the SERVER group. An entry in the list only means the information was saved; it does not confirm that the server is reachable. Next, decide how requests should be handled before turning on the connection switch. This gives you a clear basis for verifying the result.
Global Routing: Choose Config, Proxy, or Direct
The selected server determines the available proxy endpoint; Global Routing determines how requests are handled.
After adding a server, return to Home and tap Global Routing to see the current mode. This guide covers three options: Config, Proxy, and Direct. When getting started, do not just memorize the position of an option. First decide what you need to test: whether the server works or whether rules route requests as expected. These goals need to be checked separately; a single successful web page cannot confirm every setting is correct.
Config: Use the current configuration
Choose Config for everyday rule-based routing. Then open the Config page and confirm that the configuration you intend to use is enabled, rather than merely checking that a file exists. Server subscriptions and rule configurations are different things: the former provides connection details, while the latter describes how requests are handled. Importing a subscription does not mean you have already set up rules for your needs.
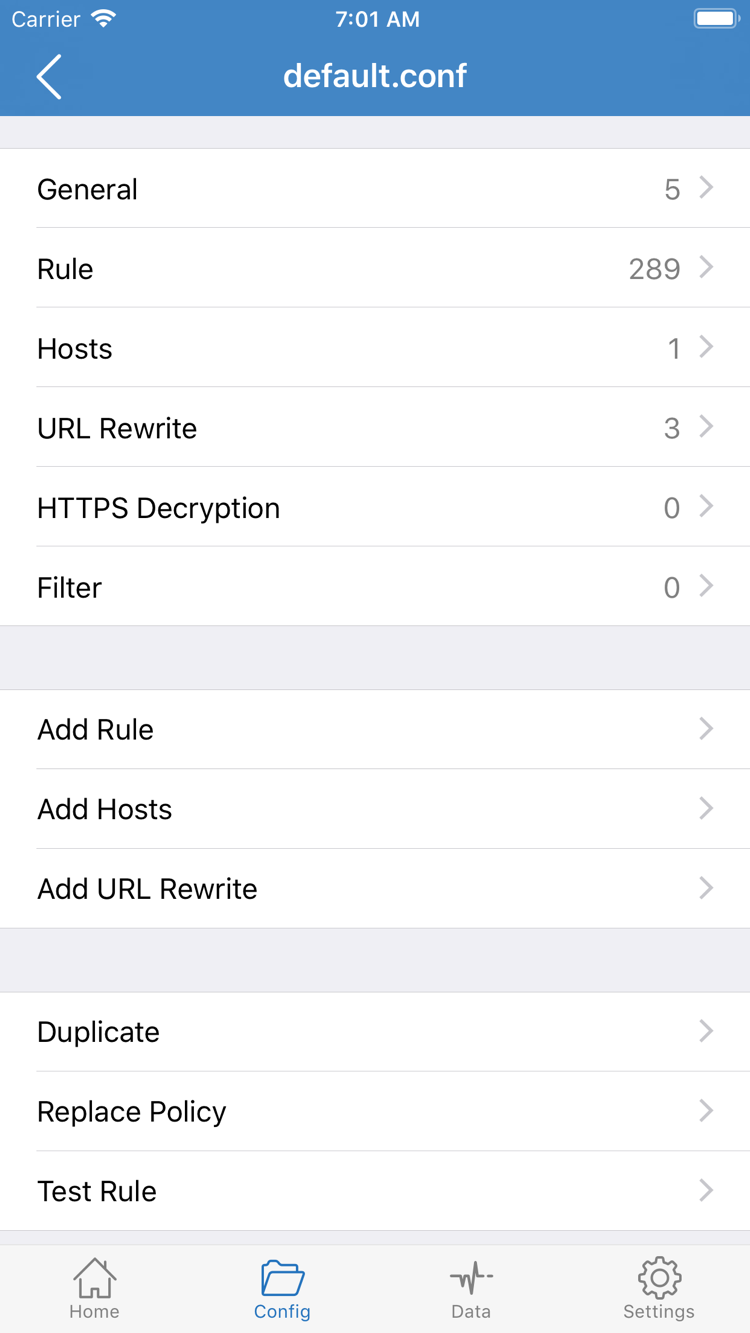
The official Config screenshot shows sections for General, Rule, Hosts, URL Rewrite, and HTTPS Decryption. To get started, check the configuration source, whether it is enabled, and the intended behavior in Rule; there is no need to edit every section. Before making changes, keep a copy, then make one adjustment through Add Rule or the existing rule editor. In particular, do not change Hosts, DNS settings, and rules all at once just to make one test pass. Otherwise, it will be difficult to identify what caused a problem.
Proxy and Direct: Use for comparison
Proxy focuses testing on the currently selected proxy connection. It is useful for temporarily checking whether the server settings and connection work, but it does not mean every app or every type of request will have the same result. Direct provides a direct-connection comparison; a page loading in this mode does not confirm that the server connection works. Restore the mode you originally intended to use after comparing results.
For example, DOMAIN-SUFFIX,example.com,PROXY in Rule matches example.com and its subdomains, then sends them to PROXY. It is not server information and cannot replace a subscription. Rules are matched in the order in the configuration, so an earlier match may affect later results. You do not need to write complex rules for your first connection; start with a configuration whose source and purpose you have confirmed. See Troubleshooting for rule edge cases and unusual behavior, and Help for common concepts.
Home: Turn On the Connection and Authorize It
Check the selected server and Global Routing once more before connecting to avoid testing the wrong setup.
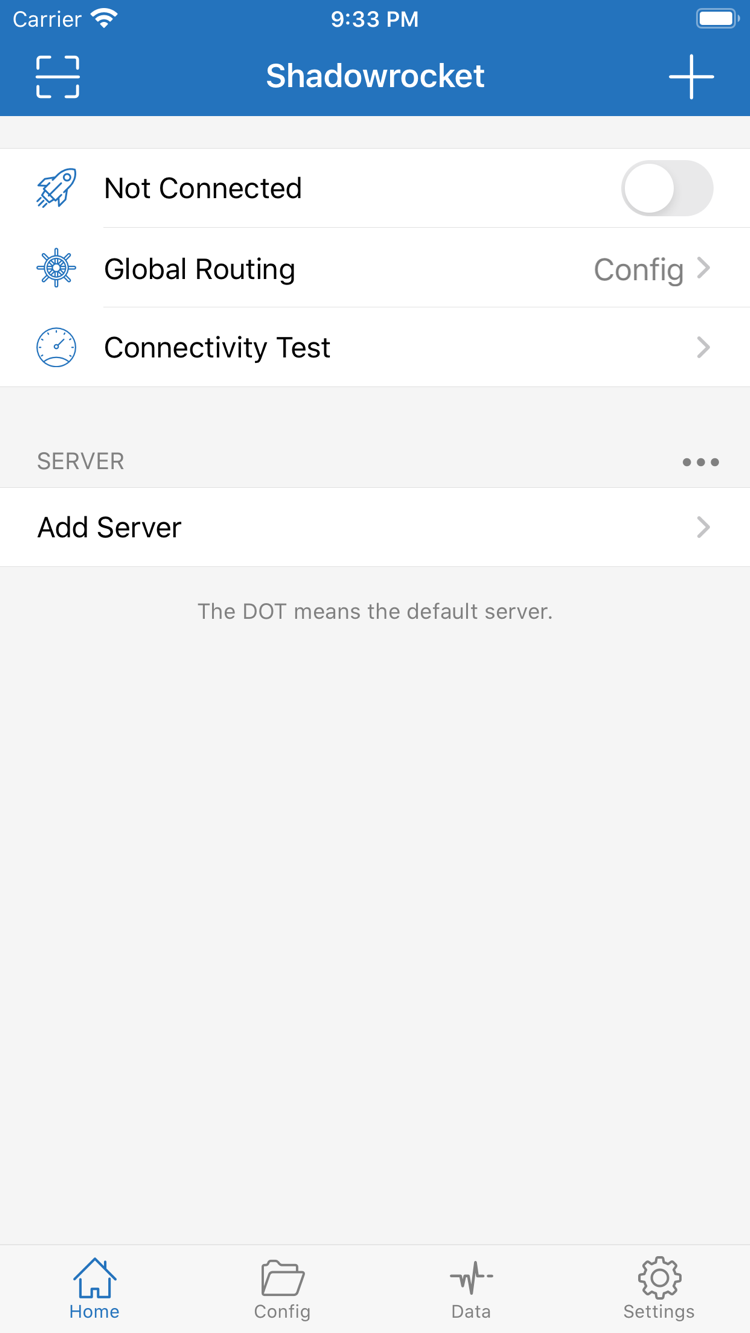
Return to Home, confirm that the server you want to test is selected in the SERVER group, and note the current Global Routing mode. Tap the connection switch at the top of the page. Before connecting, you may see Not Connected. The first time you connect, the system may ask for permission to add a VPN configuration. Confirm that the request is from Shadowrocket, allow it, and complete device authentication as required by the system. This allows the app to create a system network configuration; it does not purchase a service or provide a subscription.
After authorization, return to Home and check whether the switch and connection status remain on. If you previously canceled authorization, turn on the connection switch again and check the system prompt. Do not assume authorization is complete just because you tapped the switch once. The iPad layout may differ with screen width, but use interface labels such as Home, Global Routing, and SERVER to find the right controls; there is no need to match screenshot positions pixel by pixel.
An enabled switch only confirms that the app has entered the connection process. A VPN status shown by the system does not confirm that the remote server, domain resolution, and every rule have all been verified. Do not replace multiple servers or import more configurations yet; continue with the next test. Keeping the current server, network, and mode unchanged makes the next observations easier to compare.
If the switch turns off immediately, first check for a permission prompt or error message, then check whether the VPN configuration is allowed in the system. Devices managed by an organization may have network permissions restricted; check with the device administrator rather than deleting managed configurations. If another VPN connection is active on the device, stop the conflicting connection and try again. Do not delete system configurations if you are unsure what they are used for.
Before switching servers or making major configuration changes, you can turn off the connection, save your changes, and then turn it back on. This makes it clear which settings are in use and prevents the previous connection state from being mistaken for the result of a new configuration. If you find that it reconnects automatically, note what happens and check On Demand in Settings instead of repeatedly toggling the switch.
Connectivity Test: Check the Test and Real-World Access Separately
First check the connection path, then check the target request. A single test cannot replace verification in actual use.
Keep the connection state from the previous step and tap Connectivity Test on Home. Wait for the current test to return a result. It indicates reachability using the current test method; it is not a measurement of actual download speed, and a response in one record does not prove that every website is available. If the result is unexpected, first note the server, Global Routing mode, and network used for the test, then compare them.
Next, open a browser and visit a familiar page you are authorized to access. It is best to use a new tab and refresh it so that cached content is not mistaken for a new request. Then check a target that should be handled differently by your current configuration and see whether it loads. There is no need to look for a supposedly “universal test address.” What matters is knowing whether the current configuration is expected to handle each target with PROXY or DIRECT.
If you are using Config and the test responds but a page will not load, temporarily switch to Proxy and revisit the same target. If the result is normal in Proxy but not in Config, first check whether the current configuration is enabled, the rule order, and the handling policy. If both modes fail, check the server details, network, and test method. Direct is another comparison, not evidence that the proxy connection succeeded.
If connection records are available, use the target domain, matched rule, and actual policy together to assess the result; do not rely only on a status icon. Changing several settings after opening a single page can mix up caching, network changes, and rule adjustments. A more reliable method is to keep the target fixed, change one variable at a time, and repeat the same test. This shows where the change came from.
Restore the Global Routing mode you intend to use after testing. A complete check means that the configuration entry exists, the right server is selected, the connection stays on, and actual requests behave as expected. After that, you can manage more subscriptions or add rules. If results remain inconsistent, check the failure symptoms in the next step instead of importing the same content again.
Settings: Check Where It Failed, One Change at a Time
Start with the earliest step that failed. Check the input and permissions first, then investigate rules and the network.
Save or import fails: check the input
If a subscription does not load, first check that the complete address was copied, that the current network can reach the subscription service, and that your subscription access is valid. If a server entry will not save, check Type and required fields; changing Global Routing will not fix incorrect input. If a subscription update succeeds but the expected entries do not appear, check the returned content and group, then contact your service provider. Do not post the link publicly for someone else to test.
The switch will not stay on: check authorization and system status
If the issue occurs as soon as you turn on the switch, first check that system authorization is complete and whether another VPN connection or device management policy is interfering. If the connection automatically resumes after you turn it off, check whether On Demand is enabled in Settings and review its conditions. On Demand connects based on conditions; it will not fix an incorrect server password or port. If you temporarily change it for troubleshooting, note the original setting and restore it to suit your needs after testing.
Test times out: check parameters and Test Method
Test Method and other options are available in Settings. Different test methods can have different meanings, so check the method in use before interpreting Connectivity Test results. Compare the port, authentication, TLS, and transport parameters with your existing server details, and make sure the system date and time are correct. If the problem occurs on only one network, try another network if possible, and confirm the connection status again after switching.
Only some requests fail: check Config and Diagnostics
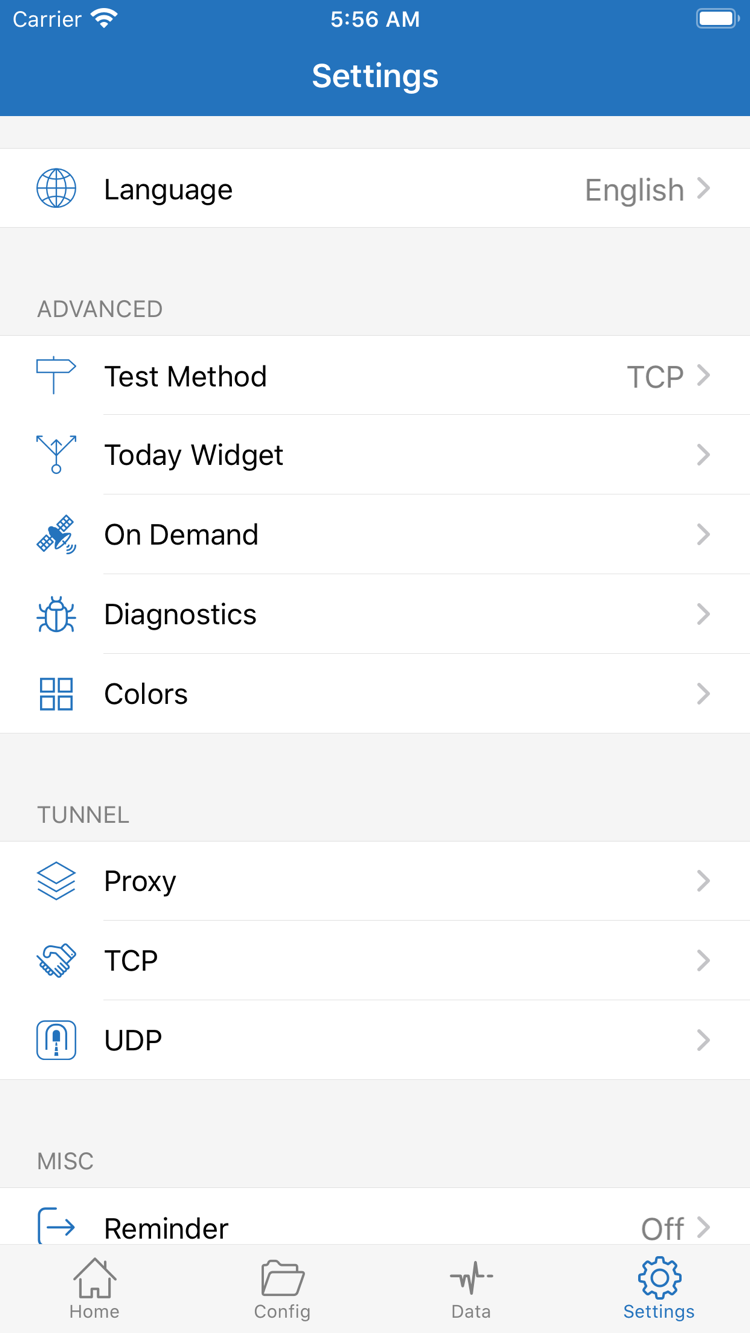
If only some pages have problems, do not immediately route all requests through Proxy long term. First compare the modes from the previous step, then check whether an earlier rule in Config is matching and use Diagnostics and available records in Settings to narrow down the issue. Proxy, TCP, and UDP in the screenshot are settings categories, not a checklist of changes you must make. Adjust an option only when the evidence points to it.
Before sharing diagnostic information, remove server addresses, authentication details, subscription parameters, and records that could identify personal browsing activity. If a single failure does not reveal the cause, keeping the minimum steps needed to reproduce it is more useful than repeatedly deleting the app. Back up existing configurations before reinstalling to avoid extra work restoring and importing them.
This completes the getting-started workflow. For persistent timeouts, DNS issues, problems after an update, or iPad-specific issues, visit Troubleshooting and follow the checks for your symptoms. For interface labels and everyday questions, see Help. Continue with the approach used in this guide: change one item at a time and retest the same target to avoid introducing new variables.
Install on Other Devices
This guide uses iPhone / iPad as an example. Shadowrocket is also available for Mac (Apple silicon and Intel), Windows, Android, and Linux. The iPhone / iPad version costs $2.99 as a one-time App Store purchase; the Mac / Windows / Android / Linux versions are free. Installers for other platforms are available from this site at /dl/. See the download page for platform selection and steps for opening the app for the first time.
If the system blocks an initial installation, first confirm the installer source, then check permissions for your system; do not bypass the source check. Read Installation and first launch. On Mac, choose a version based on the chip information in About This Mac. If you are unsure, check the information before downloading.